Topics & FAQs
Door Access Controls (6)
In very high traffic installations, environment (rec center, emergency rooms, etc.) can cause people to activate push plate switches so hard that the cover plate may damage the drywall behind it. A surface mounted box and switch may be an option , or in some instances, shimming the wall switch allows enough clearance. But Larco has you covered:
Based on customer feedback, Larco has developed a "Dress Wall Protector" plate for our 6" stainless steel press wall switches. It is intended for installations where the traffic is high and activation pressure may be excessive. In either case, the dress wall protector will prevent damage to the surrounding wall dry wall caused by "chaotic" activation of the switches. The part number is 0022828700. You can also check out the Larco UWAV for more options.


Dress Wall Protector U-WAV Touchless Switch
Part #0022828700 Part #0033681700, Gray
There are American National Standards Institute (ANSI) standards sponsored by the Builders Hardware Manufacturers Association (BHMA) that determined basic installation limits for each style of door. Standards are listed in ANSI/BHMA A156.10.
You will need to know the clear opening of the door (72" etc.), what type of door (swing, slide, bi-fold) and if the installation is to accommodate two way traffic (traffic in both directions).
Check with your local building inspector to ensure there are no local building codes that supercede those listed in the ANSI/BHMA Standards.
For general instructions on care of your Larco mat, refer to the Installation and Care of Larco Mats Instructions.
For detailed safety mat system instructions, reference the Installation, Use and Maintenance Guide Instructions.
Typical trim kits used in the automatic door industry are comprised of three (3) pieces of aluminum extrusion that have been mitered at the corners for a clean fit. Each piece is pre-drilled and countersunk - ready for installation. The kits also include stainless steel screws with anchors to hold them securely.
Any number of Larco mats can be installed side-by-side to obtain any dimensions required. To join mats effectively the lock lip edge is removed from each mat where any two mats are joined together, and a section of Active Joiner extrusion #230010 is placed under that seam. Joining mats in this way guarantees a 100% "active" seam.
ANSI/BHMA A156.10 standards call for the trim to have a width equal to four (4) times the thickness of the mat. This means for a half inch thick mat, the trim would have to be at least two inches wide at a minimum.
Other considerations:
What type of edge attachment does the mat have? Some trim is designed to "rest" on the gradual tapered edge of the mat, while other trim "traps" the mat, and still others "lock" the mat in place.What type of traffic and loads are anticipated? Grocery stores have heavy foot traffic and heavy loads (shopping carts). Hospitals require a more gradual ramp, with less foot traffic but heavy loads (hospital beds and wheel chairs).
Choose a trim that will best meet the needs of the installation. Generally speaking, if heavy loads are expected, use a trim element that has additional internal support and will provide the best slope angle to disperse the weight evenly.
Handicap ADA Push Plate Switches (1)
In very high traffic installations, environment (rec center, emergency rooms, etc.) can cause people to activate push plate switches so hard that the cover plate may damage the drywall behind it. A surface mounted box and switch may be an option , or in some instances, shimming the wall switch allows enough clearance. But Larco has you covered:
Based on customer feedback, Larco has developed a "Dress Wall Protector" plate for our 6" stainless steel press wall switches. It is intended for installations where the traffic is high and activation pressure may be excessive. In either case, the dress wall protector will prevent damage to the surrounding wall dry wall caused by "chaotic" activation of the switches. The part number is 0022828700. You can also check out the Larco UWAV for more options.
Dress Wall Protector U-WAV Touchless Switch
Part #0022828700 Part #0033681700, Gray
Automatic Door Mats (5)
There are American National Standards Institute (ANSI) standards sponsored by the Builders Hardware Manufacturers Association (BHMA) that determined basic installation limits for each style of door. Standards are listed in ANSI/BHMA A156.10.
You will need to know the clear opening of the door (72" etc.), what type of door (swing, slide, bi-fold) and if the installation is to accommodate two way traffic (traffic in both directions).
Check with your local building inspector to ensure there are no local building codes that supercede those listed in the ANSI/BHMA Standards.
For general instructions on care of your Larco mat, refer to the Installation and Care of Larco Mats Instructions.
For detailed safety mat system instructions, reference the Installation, Use and Maintenance Guide Instructions.
Typical trim kits used in the automatic door industry are comprised of three (3) pieces of aluminum extrusion that have been mitered at the corners for a clean fit. Each piece is pre-drilled and countersunk - ready for installation. The kits also include stainless steel screws with anchors to hold them securely.
Any number of Larco mats can be installed side-by-side to obtain any dimensions required. To join mats effectively the lock lip edge is removed from each mat where any two mats are joined together, and a section of Active Joiner extrusion #230010 is placed under that seam. Joining mats in this way guarantees a 100% "active" seam.
ANSI/BHMA A156.10 standards call for the trim to have a width equal to four (4) times the thickness of the mat. This means for a half inch thick mat, the trim would have to be at least two inches wide at a minimum.
Other considerations:
What type of edge attachment does the mat have? Some trim is designed to "rest" on the gradual tapered edge of the mat, while other trim "traps" the mat, and still others "lock" the mat in place.What type of traffic and loads are anticipated? Grocery stores have heavy foot traffic and heavy loads (shopping carts). Hospitals require a more gradual ramp, with less foot traffic but heavy loads (hospital beds and wheel chairs).
Choose a trim that will best meet the needs of the installation. Generally speaking, if heavy loads are expected, use a trim element that has additional internal support and will provide the best slope angle to disperse the weight evenly.
Industrial Safety (9)
Larco mats are available in a number of color options. Standard mat colors are black or yellow. Other colors are available for an additional charge, including brown, grey, blue, red and other custom colors. Larco can also create colored-inset logo designs or signage. Contact the factory for options.
Larco mats are designed to withstand load capacities of 3000 PSI. If forklift traffic is expected, Larco suggests the uses of the 2-1/2" ramp trim extrusion (#211926) which has a more heavy duty design as compared to the standard 2" ramp trim extrusion (#219033).


2-1/2" ramp trim extrusion 2" ramp trim extrusion
#211926 #219033.
Choosing the right Larco safety mat controller is an important decision, balancing features and options required while maintaining a high level of productivity. Larco's high-quality, high-performance safety controls can accommodate almost any industrial safety demand.
Recommended Cleaners:
Most good quality industrial cleaners/degreasers are acceptable. NOTE: cleaning solutions that contain phosphates, chlorine, organic solvents or mineral spirits should NOT be used.Be sure to read and follow all manufacturers’ directions, recommendations, warnings and proper disposal procedures for all cleaning solutions.Wear all recommended safety equipment.
Pressure Washing:
Remove any loose debris from the mat surface before beginning the cleaning process.Use a flat fan spray nozzle with a pattern angle of 15 degrees or larger.Keep spray distance 12 inches (305 mm) or more away from the mat surface.Spray pressure should not exceed 1,500 psi (103.4 Bar)Water temperature should not exceed 190o F (88o C)Keep the spray pattern moving; do not concentrate it in one location for an extended period of time.Heavily soiled mats should be pre-soaked for 10 minutes with the mixed cleaning solution. Areas can be brushed with a hand utility brush.When cleaning is completed, rinse with clean water.
Steam Cleaning:
Use the same operating recommendations as shown in the pressure washing cleaning section
Good Cleaning Practices Should be Utilized During Cleaning Operations
Wear safety glasses and all recommended safety gear.Install safety signs indicating wet floors.Install safety barriers where required.Turn off required electrical connections.Cover all equipment that can be damaged by cleaning.Be sure the area is completely dry before removing safety barriers and signs and restoring electrical connections.
For general instructions on care of your Larco mat, refer to the Installation and Care of Larco Mats Instructions.
For detailed safety mat system instructions, reference the Installation, Use and Maintenance Guide Instructions.
Typical trim kits used in the automatic door industry are comprised of three (3) pieces of aluminum extrusion that have been mitered at the corners for a clean fit. Each piece is pre-drilled and countersunk - ready for installation. The kits also include stainless steel screws with anchors to hold them securely.
Larco can modify any of the standard mat sizes at time of manufacturing to create an unlimited number of "custom" mat sizes and shapes. Fully customized lengths and/or widths as well as engineered notches, angles and radiuses are available on any of our mats. Contact the factory to discuss your design requirements.
You can place any number of Larco mats side by side to obtain whatever length you desire. The only thing you are required to do is to remove the lock lip edge from each mat where any two mats are joined together.
You then must place a piece of Active Joiner extrusion #230010 under that seam which guarantees a 100% active seam where the two mats are joined.
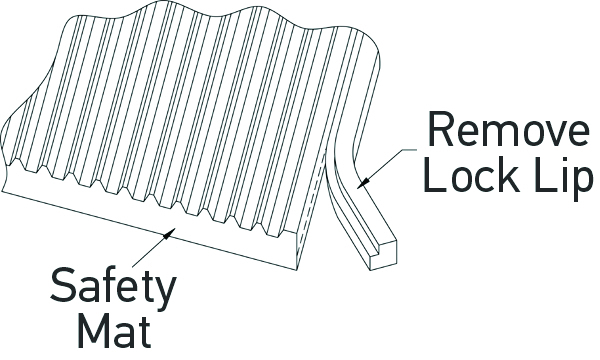

Remove Lock Lip Edge Active Joiner extrusion #230010 shown under two mats
Any number of Larco mats can be installed side-by-side to obtain any dimensions required. To join mats effectively the lock lip edge is removed from each mat where any two mats are joined together, and a section of Active Joiner extrusion #230010 is placed under that seam. Joining mats in this way guarantees a 100% "active" seam.
Safety Mats (8)
Larco mats are available in a number of color options. Standard mat colors are black or yellow. Other colors are available for an additional charge, including brown, grey, blue, red and other custom colors. Larco can also create colored-inset logo designs or signage. Contact the factory for options.
Larco mats are designed to withstand load capacities of 3000 PSI. If forklift traffic is expected, Larco suggests the uses of the 2-1/2" ramp trim extrusion (#211926) which has a more heavy duty design as compared to the standard 2" ramp trim extrusion (#219033).
2-1/2" ramp trim extrusion 2" ramp trim extrusion
#211926 #219033.
Recommended Cleaners:
Most good quality industrial cleaners/degreasers are acceptable. NOTE: cleaning solutions that contain phosphates, chlorine, organic solvents or mineral spirits should NOT be used.Be sure to read and follow all manufacturers’ directions, recommendations, warnings and proper disposal procedures for all cleaning solutions.Wear all recommended safety equipment.
Pressure Washing:
Remove any loose debris from the mat surface before beginning the cleaning process.Use a flat fan spray nozzle with a pattern angle of 15 degrees or larger.Keep spray distance 12 inches (305 mm) or more away from the mat surface.Spray pressure should not exceed 1,500 psi (103.4 Bar)Water temperature should not exceed 190o F (88o C)Keep the spray pattern moving; do not concentrate it in one location for an extended period of time.Heavily soiled mats should be pre-soaked for 10 minutes with the mixed cleaning solution. Areas can be brushed with a hand utility brush.When cleaning is completed, rinse with clean water.
Steam Cleaning:
Use the same operating recommendations as shown in the pressure washing cleaning section
Good Cleaning Practices Should be Utilized During Cleaning Operations
Wear safety glasses and all recommended safety gear.Install safety signs indicating wet floors.Install safety barriers where required.Turn off required electrical connections.Cover all equipment that can be damaged by cleaning.Be sure the area is completely dry before removing safety barriers and signs and restoring electrical connections.
For general instructions on care of your Larco mat, refer to the Installation and Care of Larco Mats Instructions.
For detailed safety mat system instructions, reference the Installation, Use and Maintenance Guide Instructions.
Typical trim kits used in the automatic door industry are comprised of three (3) pieces of aluminum extrusion that have been mitered at the corners for a clean fit. Each piece is pre-drilled and countersunk - ready for installation. The kits also include stainless steel screws with anchors to hold them securely.
Larco can modify any of the standard mat sizes at time of manufacturing to create an unlimited number of "custom" mat sizes and shapes. Fully customized lengths and/or widths as well as engineered notches, angles and radiuses are available on any of our mats. Contact the factory to discuss your design requirements.
You can place any number of Larco mats side by side to obtain whatever length you desire. The only thing you are required to do is to remove the lock lip edge from each mat where any two mats are joined together.
You then must place a piece of Active Joiner extrusion #230010 under that seam which guarantees a 100% active seam where the two mats are joined.
Remove Lock Lip Edge Active Joiner extrusion #230010 shown under two mats
Any number of Larco mats can be installed side-by-side to obtain any dimensions required. To join mats effectively the lock lip edge is removed from each mat where any two mats are joined together, and a section of Active Joiner extrusion #230010 is placed under that seam. Joining mats in this way guarantees a 100% "active" seam.
Controllers (1)
Choosing the right Larco safety mat controller is an important decision, balancing features and options required while maintaining a high level of productivity. Larco's high-quality, high-performance safety controls can accommodate almost any industrial safety demand.
Presence Sensing (3)
For general instructions on care of your Larco mat, refer to the Installation and Care of Larco Mats Instructions.
For detailed safety mat system instructions, reference the Installation, Use and Maintenance Guide Instructions.
Typical trim kits used in the automatic door industry are comprised of three (3) pieces of aluminum extrusion that have been mitered at the corners for a clean fit. Each piece is pre-drilled and countersunk - ready for installation. The kits also include stainless steel screws with anchors to hold them securely.
Any number of Larco mats can be installed side-by-side to obtain any dimensions required. To join mats effectively the lock lip edge is removed from each mat where any two mats are joined together, and a section of Active Joiner extrusion #230010 is placed under that seam. Joining mats in this way guarantees a 100% "active" seam.
Kiosk Security Mats (3)
For general instructions on care of your Larco mat, refer to the Installation and Care of Larco Mats Instructions.
For detailed safety mat system instructions, reference the Installation, Use and Maintenance Guide Instructions.
Typical trim kits used in the automatic door industry are comprised of three (3) pieces of aluminum extrusion that have been mitered at the corners for a clean fit. Each piece is pre-drilled and countersunk - ready for installation. The kits also include stainless steel screws with anchors to hold them securely.
Any number of Larco mats can be installed side-by-side to obtain any dimensions required. To join mats effectively the lock lip edge is removed from each mat where any two mats are joined together, and a section of Active Joiner extrusion #230010 is placed under that seam. Joining mats in this way guarantees a 100% "active" seam.
Dual Zone Mats (2)
For general instructions on care of your Larco mat, refer to the Installation and Care of Larco Mats Instructions.
For detailed safety mat system instructions, reference the Installation, Use and Maintenance Guide Instructions.
Any number of Larco mats can be installed side-by-side to obtain any dimensions required. To join mats effectively the lock lip edge is removed from each mat where any two mats are joined together, and a section of Active Joiner extrusion #230010 is placed under that seam. Joining mats in this way guarantees a 100% "active" seam.